

2cm Flak auf Krupp Protze


Komentarzy
7 August 2013, 08:30
an insane level of detail... best way to go insane...
I guess I have go on with the Protze... to calm down a bit 😄
7 August 2013, 08:37
Hi Fabian - I know the kit of the Flak. Nearly too much parts!!! - But you have a good start, I believe. 👍
7 August 2013, 08:44
I hope so... but I´m glad I have the option to switch to the Protze all the time😉
7 August 2013, 08:47
continued with the Flak and the Protze...
what do you think about the scatched fasteners (pic 8 )? I´m not shure if I´ll keep them...
8 August 2013, 08:46
Hi Fabian
I think the fasteners look good, you should keep them.Here is a reference pic.Feel free to have a look.
[img1]

8 August 2013, 13:02
Thanks Markus, I reshaped the fasteners... they look better now
I used the contacts of a flat cable of an old PC
9 August 2013, 08:16
2nd floor is done.... next steps: adding some more small parts to the Flak and then painting
12 August 2013, 22:25
Great Idea with the Balsa Wood.Looks better than anything else 👍
14 August 2013, 18:45
And it´s so easy to handle 🙂
Finished construction and painting, startet with the weathering on the cargo-area
30 August 2013, 16:25
pics #20-22, so much Detail, even hard for the better camera to hande with it😉
27 October 2013, 16:48
Nicely done until now - but it's really a long way in building up these two kits...
27 October 2013, 17:02
thanks Mike, the key to this is motivaton, if i haden´t joined the AA-Campain on Armorama... 😉
27 October 2013, 22:18
the Flak 38 came out really well, great job, cant wait to see the Boxer
28 October 2013, 00:54
Fantastic work so far mate! I have that Flak on my list, good to watch you building here.😉 Greetings from China!
28 October 2013, 14:12
thanks mates, I hope the Protze will also turne out that nice😢
Matthias, i can just recomend this kit, will be hard to stay calm all the time, but it´s worth it😉
28 October 2013, 14:35
I just used what was in the kit, some ammo bins, mags, an extra shiled for the gunner and a trailer with the stowage box were also included
28 October 2013, 14:54
a litte bit frustarting to have so litte progress in such a long time...but thats normal a this stage of the procject... let´s see how far I get tonight😉
Have already pre-cut the canvas doors and suculpted the windshield cover
23 November 2013, 21:20
looking pretty good Fabian, i like what your doing to that old Tamiya Boxer really setting it apart
24 November 2013, 00:37
wow, that just keeps getting better....all those small bits would drive me nuts!
24 November 2013, 08:44
Thanks for ceeping me motivated 😉
@Hunter: it might just seem like I am one...but i´ve just got too much time 😉
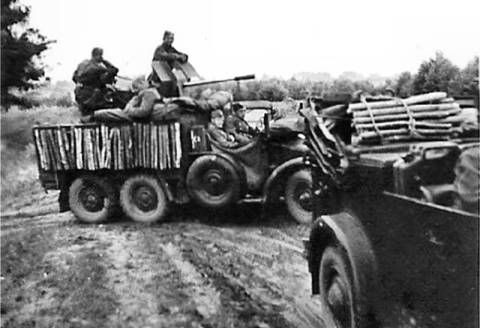
The wooden floor is is there, cause I saw it here: [img1]
it´s the base for the Flak, resulting out of the shape of the "cargo" area which was desinged for passenger transportation and not for Flaks 😉
24 November 2013, 19:02
I meant the wood by the truck haha not the planking that the flak is on😉
And can isteal your idea cause I want to build one now 😄
24 November 2013, 19:40
For what reason ever I missed this one... Great work on the Flak and on the Krupp. Did something like this with a Henschel Truck. But anyway, very nice work!
24 November 2013, 19:51
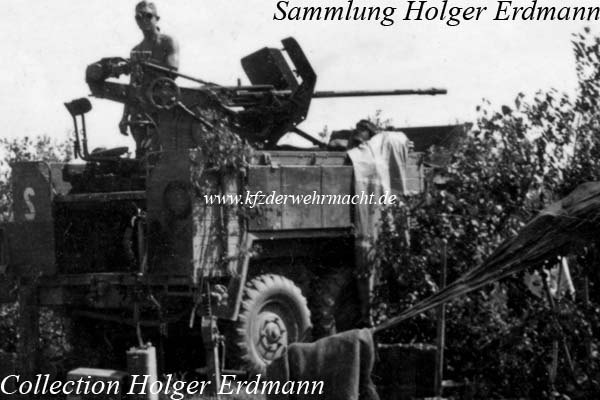
@ Hunter.... got it now 😉 I´d say it´s something like a corduroy bridge, used to improve traction on mud, it was attached on the side of the truck. (this picture is my reference... forgot to post it here...)[img1]
I´m not the first one building this modificaton... feel free to copy all you want 😉
@Christian: Thanks, saw it... might also be that i belauded your work 😉
the Henschel will be the base for my next conversion... but not with a Flak ( Field kitchen scenery | Project by nng (1:35) )
24 November 2013, 20:13
Ok thanks fbian😉🙂 im highky looking forward to seeing this ome done 🙂
24 November 2013, 20:23
Progress of the weekend: canvas done, only some smaller parts and the weathering missing
24 November 2013, 21:14
Nice progress, Fabian! I like what you're doing. Keep up good job. 👍
24 November 2013, 21:36
Hi Fabian - the "Knüppelteppich" is really an eyecatcher!!! - Looks great. 👍
25 November 2013, 18:23
Done! Just in time for the deadline😉
Double thanks to Mike... Knüppelteppich was the word I was looking for all the time...
29 December 2013, 16:30
👍 Congratulations, Fabian! Well done! May be the tyres could receive another shade of brown.
29 December 2013, 16:52
Thanks Frank... already thought about that, but i´ve the ambition to build a small base or something (but not right now😉 )... if I ever do so it´s way easier to match the colors of the ground with the second one on tires
29 December 2013, 17:00
👍 Ok, understood! Woohoo, a base.. ! I'm looking forward to that!
Wish you ALL THE BEST for 2014!
29 December 2013, 17:05
Youshould put some mud in the rims but other than tnat jts perfect 😄😄😄
29 December 2013, 17:53
Thanks chaps...
@Frank: same back... might be that you´ll need to waint for a few years, If you want to see the finished base😉 😄
@Hunter: I´ve based my weathering on my reference pic (somewhere above in the tread) and surprisinly the vechicle seems to be quite clean
@Mathias: you´re putting pressure on me, but thanks😉
30 December 2013, 14:56
Ahhh I see and that is very strange but hey its a real vehical😉😛
30 December 2013, 16:29


