
Subiect început de bughunter
a adăugat un nou photoalbum.


40 18 January, 16:16
There are this Eduard Weekend kits - where I never understood how this can be done on a weekend.
So I use this brand new kit with only seven parts to try a speed build 🙂 Not sure a weekend will be enough. I put the Junkers aside for a moment because I want to have a finished model for the next club meeting and I think I will not be able to finish the Junkers F.13 until then.
18 January, 16:32
Ahhhh... what a treat when the 1:48 WWI-aircraft master turns his attention to such subjects as the Piper Cub, the Stearman and now the Pou-du-Ciel!
1 18 January, 16:37
Thank you Alex! You forgot to mention my car projects 😉 But that doesn't mean that I'm completely moving away from those biplanes.
18 January, 19:30
Looking forward to see the result. I'm always amazed when I see the real thing hanging in the big airplane hangar of the army museum here in Brussels. In the 80s, there was a French series about the history of aviation (Les Faucheurs de Marguerites) and in the last season (IIRC), someone was building the Pou-du-Cil in his garage, just to fly it once.
Very interesting subject.
18 January, 21:24
Oh yes! Watching! (Perhaps you would be interested in that, Frank:
De Havilland Biplane No.1 (1..Miniature Ltd HW48003, 1:48) - I've just purchased one 😉 )
 (Aircraft In Miniature Ltd HW48003)")
19 January, 09:55
Welcome mates!
@Lord, I will build the one one from the kit. It provides only one identification, the one from the RAF Museum Cosford. It is from 1936 and seems to be very original. No wonder that only one is possible because each one is different with specific engines and so on.
@Jürgen Immer dieser Druck, dieser unglaubliche Druck! 🙂
@Robert You and your build are responsible that I'm doing this kit now! Thanks 👍
1 19 January, 16:14
If I may... Frank (and René) raise(s) an interesting and legitimate question: the quasi-uniqueness of each Pou, mainly due to the different engines used. For instance, that's precisely the reason I never dared to start the 1:72 Aeroclub Pou I purchased decades ago, because, for the Greek Pou-du-ciel I'm interested in, I will have to scratch a Rotax 377 - and I'm afraid I'm not up to it. But, on the other hand, I think that more experienced modellers (let alone master modellers like bughunter) could easily overcome this, if they decide to go for a specific Pou of special interest to them, perhaps registered in their country or kept in a local museum (as Wikipedia shows, the number of Mignet aircraft preserved in museums around the world is non negligeable!)
But, in any case, thank you Robert and Frank for bringing this classic design to our newsfeed!
[@ Robert: I just noticed that your recent Pou photoalbum has turned, probably inadvertently -a known scm bug- into "private"... you might want to check this with Tim...]
2 19 January, 17:29
Good points ... I just started some scratch work to have an excuse for missing the "Weekend" deadline 🙂
I can see Roberts album if I go via his project so it is not private. It's "only" disappeared from Newsfeed.
19 January, 17:38
I can see it too - but if you check, no comments & likes are visible, and you cannot comment any more etc. This is a known bug, I think, that has happened to a number of us in the past, the album turns inadvertently in "private mode". Tim can reverse this, if asked by Robert.
2 19 January, 17:43
Yes CaptGPF, from an interesting kit.
The kit is not bad, the 3D steps are very thin and can be sanded and primed/sanded. But my specimen had a thick line through the fuselage, wheels etc as if the printer had had a hiccup - very annoying!
19 January, 19:25
Thanks and welcome mates!
The weekend is over and I failed to finish this little flea. But I must admit we had a nice weather today with sun so I spend some time outside instead of sitting on the work bench. I made a good progress on the fuselage anyway but wings needs to be mounted followed by rigging. And I want to scratch a new correct tail mount of the rudder, with tail wheels.
1 19 January, 21:42
Frank, it's an interesting coincidence. When I was recently thinking about a model that could be built quickly and still look good, I came to the same conclusion as you. I dismissed the Eduard kits from the Weekend line. In my opinion, they are for modelers who build their models straight out of the box and have no need to make any improvements to the model. This is not my case, I would definitely buy the available accessories for the Weekend kits, or I would reach for the same kit, but from the Profi series, which already contains various accessories ... and the magic of quick model building would disappear. In the end, like you, the 3D printed kit (Czechoslovak HC-2 helicopter) with a small number of parts won 🙂.
I will definitely follow and wish you a smooth progress and successful model building.
3 19 January, 23:13
I take my eyes off the builds for a couple of days and you've nearly completed a kit! 😮
Very nice work so far Frank.
1 20 January, 09:06
Thank you very much mates for your nice comments!
@Ludvík I checked this heli out - very nice kit indeed! We live in golden times of modelling with lot of small companies doing small series like this. I have build a Eduard Weekend kit as I wanted to build a specific livre and need the decals. But yes, I added PE and scratch work, so I need much longer. I always wonder if it is possible to build a kit on a weekend, due to drying times of paints and decals. Now with using modern acrylic lacquer paints this seems to be possible!
@Marcel Funny names here: in English flea, in French "Pou du Ciel" translated to louse and in German too "Himmelslaus", which translated to sky louse.
@gorby It's nice to know that you're looking over my shoulder here too 🙂
2 20 January, 11:58
Now things are getting a little crazy: new tail wheels have been turned and work has begun on the tail column for the wheels, rudder and suspension.
1 20 January, 21:00
Except the steering cables, the tail is now finished. 🙂
It is a very clever designed multi-functional part! I must admit, that I have not understand at the beginnings how it works and how to replicate it on the model. But I simply started and developed it step by step. Sketches in this book Book: Henri Mignet and His Flying Fleas (by Ken Ellis, Geoff Jones) and high res pics of the original in the museum were big help.
")
1 21 January, 21:31
Again my "Improvement by accident" method! I had to made a new windshield after the first one was killed during rigging process and the new one is closer to the original subject 🙂
A big step forward as the wings are mounted and the rigging is completed. There's no way I could build this with the 3D-printed struts - the model would only survive the meter from the workbench to the display case, but not transport to club or exhibition. Why don't manufacturers just include a piece of wire instead of designing and printing the struts?
Some small tasks are still to be done, but that will be done tomorrow. So finish within a week (in opposite to the weekend I thought about at the beginning) should be possible.
2 22 January, 22:57
This project is finished! 🙂
This brand new kit is not bad, but I'm not completely happy with my build. But yes, it comes somehow close to the real one in the museum in Cosford.
@Alex K As the wings and the fuselage are nice I think it would be an option to remove the engine, scratch a new specific engine and display another specific original. With replacing the strut work with metal the beast would be more stable and robust, compared against my wobbly thing. A real rigging with fishing line would make it more stable too, but I feared to put the resin wings under load to avoid bending down in long term as here are no steel wires inside (a thing with LukGraph does).
Once the weather permits I will do the final shots for a new album.
5 23 January, 16:01
Fantastic job, Frank! (If only manufacturers of 3D printed models had more experience with building models, they would perhaps know, how to divide the kit reasonably into modeller-friendly pieces...)
23 January, 17:27
Frank, even if you're not completely satisfied, you did a great job on the model. The excellent detail work is all the more impressive considering how small this model is. With a wingspan of 12.5 cm and a length of 8 cm, it is smaller than most 1:72 scale models! The name Heavenly Flea belongs to it rightfully.
23 January, 21:47
Thank you Robert!
Found not a nice picture which helps to understand the construction:
[img1]
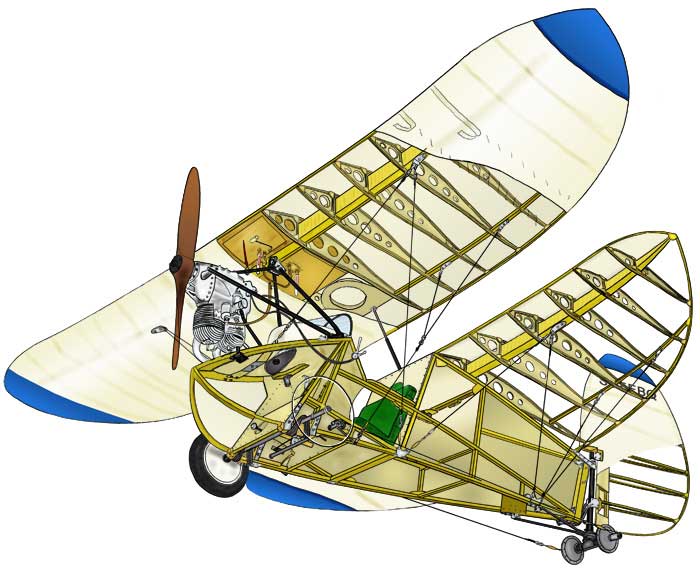
1 23 January, 21:49
What the heck???
I never heard about this plane. It looks very different, pretty weird.
But you did a nice job.
The tail wheels are AMS in perfection. 🙂
23 January, 21:57
Oops, I have not seen your comment Ludvík as we have types in parallel. Thank your very much! Yes, that is the smallest 1:48 in my cabinet.
Yes Christoph, it is very special: no pedals, no elevator, no ailerons. A very simplified way to fly 🙂 I was also only aware of this type due to models by Robert and BAT21 here, and also on Modellversium. Beside this HM-14 there a much more planes of this concept, see en.wikipedia.org/wik..Pou-du-Ciel#Variants
1 23 January, 22:19
originally 7 parts, how many did you add? but quick build nevertheless, and fantastic results as well!
1 24 January, 09:57
Thank you mates!
Yeah Spanjaard, I added much more individual parts, like turnbuckles and also scratched much more (but have not counted).
24 January, 14:39
I agree with Spanjaard! The super-detailing is amazing - and at such microscopic scale, absolutely stunning! You should rename this to "The SUPER Flea"!
24 January, 15:15
Again, your scratch building and detailing skills in the ant realm are mind boggling. What you did to the tail wheel alone is simply ridiculous...
24 January, 15:26
Wow, thank you mates for visiting this build and leaving a comment - highly appreciated!
Such scratch work is fun, but "microscopic scale"? I mean that is 1:48, so the biggest kit of the Flea available! If you wont to see microscopic Fleas, see the builds attached to this kit: Mignet HM-14 Pou-du-Ciel (Brengun BRS144023, 1:144)
Interestingly, I have just noticed that the tailplane construction of this kit in 1:144 comes closer to the original than my kit here in 1:48 due to the use of PE.
")
Yesterday evening I unfortunately collided with the rudder, which caused the control cables to elongate. Now they are sagging like on the museum machine. So now it's original in this detail too. 🙂
1 24 January, 15:54
Don't miss the final outdoor shots in an own album here:
The "Flying Flea" G-AEEH prepared for flight | Album by bughunter (1:48)
24 January, 17:25
Frank you were so quick with this one it completely passed me by!! Bravo!
1 25 January, 01:02
I have completely missed this speed build! Outstanding as all your builds. Now off to see the finished album pics…
1 25 January, 15:00
Thank you all and greetings to the late visitors! Luckily nothing is lost here and available for late review 🙂
25 January, 18:53
Great! I hope to see this little jewel in Lingen. It is best to stick the flea to the base so that it does not hop away🙂🙂
2 March, 07:22
Thank you mates!
@Bernhard I will have it with me in Lingen for sure, and your metal too! It is very unlikely that the flea will hop away, as the resin makes it very heavy for its size 🙂
2 March, 09:14