
聊天主题开始于 Mimoid
添加了一个新相册
67 图片
Il-28 'Beagle' - Trumpeter - перезагрузился!
1:72
A tiny bit of weathering applied to the panel lines with Tamiya Panel Liner and diluted 502 Abteilung oils. I actually l...


64 6 January, 15:50
You need to pay attention that the IL-28 produced in China had differences.
It's not right to just make it with red stars.
7 January, 11:57
Thank you gentlemen! 🙂 Denis, yes, I know, the kit contains all the parts for the Soviet built Il-28, they need to replace the kit original parts for the H-5. But the truth is that this kit has so many incorrect features, that it really doesn't matter that much. I simply intend to have fun!
7 January, 14:00
Dear fellow modelers, you are all welcome to enjoy watching me struggle.
1 11 January, 10:11
I got tired of all the filling and sanding and put my own piece aside. But I'll be following your build and keeping my fingers crossed 😊
12 January, 10:48
I have a feeling of deja vu that I followed it last year. Is it just me?
Following anyway 🙂
13 January, 12:48
Łukasz, you are absolutely right. The first project ended up with the half-finished model flying gracefully into the bin after one mistake too many. I am now giving it a second attempt, knowing the pitfalls in advance and also possibly being slightly more experienced. I am already past the line where I gave up the last time. To be quite honest, this kit is not that bad, it just needs a bit of persuasion and elbow grease.
13 January, 13:26
Hope it's going better this time, looking for reference before I start mine.
13 January, 14:27
Great progress, Thomas! Those engine mods look cool 👍
In pic 42, is it necessary to glue the bending part of the landing gear piece or is bending it enough? Thanks!
14 January, 19:35
Cuajete, thank you! No, you need to cement the part. Unfortunately the fit is rather poor, so you will need to be careful with the correct alignment or the model will not sit straight on its wheels.
1 15 January, 05:40
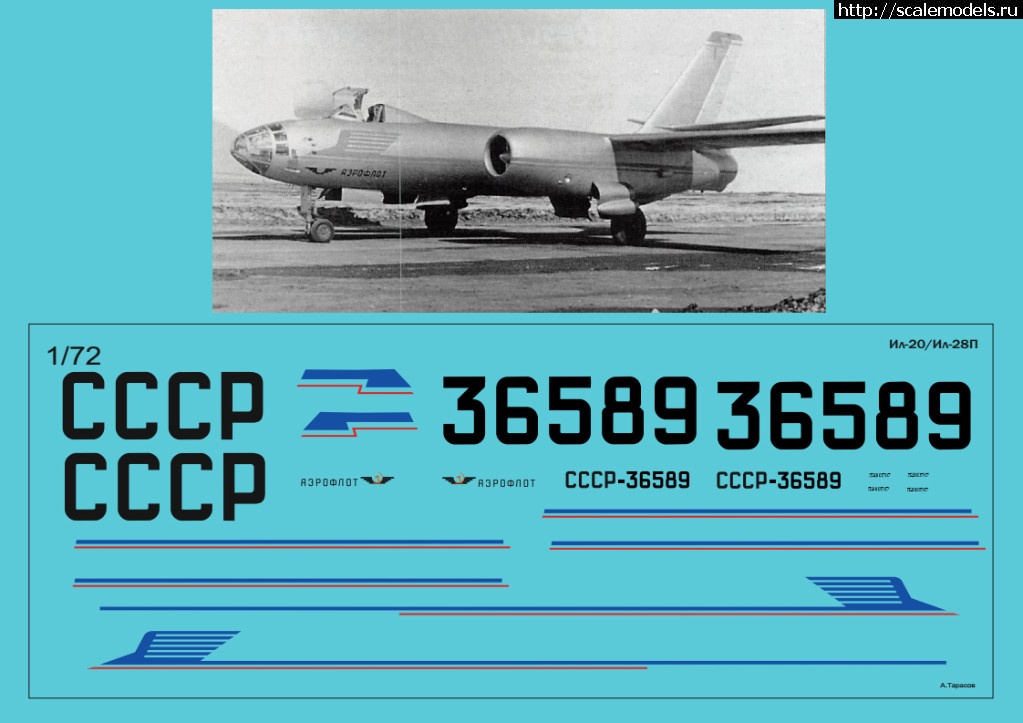
Interestingly, the IL-28 was flown by Aeroflot.
477768.livejournal.c..utm_source=3userpost
[img1]
[img2]
[img3]


1 15 January, 08:43
In the article linked above, it says that he carried urgent mail and the matrices of the central newspapers.
2 15 January, 12:02
I am now getting to a tedious level where I am just trying to eliminate the rough patches before priming. Lots of filling, sanding and polishing. Since the Hungarian Beagles had extremely smooth metal surfaces (coated with a clear coat), every blemish needs to be fixed or they will just stick out like a sore thumb.
17 January, 07:59
I feel your pain Thomas. I am dealing with same on my build. Overall, your Beagle rebooted build is coming along nicely I think 👍
1 17 January, 13:13
I usually use super glue for filler to speed up the process since it doesn't shrink and dries quickly. A modified electric toothbrush can help with sanding and polishing. I've had some pretty good results using mine. I just glued a Velcro disk onto it and attached the soft side of the Velcro to any sandpaper that didn't have it already.
2 19 January, 10:32
Skyhiker, thank you for the tip! 🙂 I have in the past tried to use superglue, but I find it that it dries really hard, much harder than the plastic and so it is very difficult to get an even surface. I also tried liquid styrene (pieces of sprue molten i solvent), but it takes ages to solidify and is super messy. Nowadays I just take my time with regular putty and sanding sticks and finish off with Mr Hobby polishing cloths. I then use a regular manual toothbrush to brush over the surfaces and clean up the panel lines.
1 19 January, 11:32
Well done so far, Thomas 👍
I think it's better to mix cyano with talcum powder for smoother sanding. I've heard something about that, but haven't tried it yet.
1 19 January, 19:48
CA poured on baking soda works very well - at least with resin. I tried it on my "Texaco bug", filled an indent with it and no one could tell where it was done 😉
2 19 January, 19:59
Cuajete & Robert, I will need to try the CA + baking soda recipe! Thanks for the suggestion!
2 19 January, 20:14
You're dashing like hell and I still have deja vu watching these pics 😛
1 19 January, 21:48
Hi Thomas 👋
I use super glue gell , the locktite version, it is really fence think super glue, but it doesn't dry as hard sands bit easier.
I've used super glue and soda it did generated alot of heat and fumes. Experiment with it first l would advise.
Super glue gell is slower to dry, l tend to leave it for an overnight dry.
1 19 January, 21:48
Many of us are probably at the same stage. My second one is waiting for me in the storage. The first one literally flew away. My oldest son is mounting it for a drone. I'll post a link to the video on Instagram tonight.
1 20 January, 07:12
This is my first Il-28 piloted by my son. instagram.com/reel/D..gsh=MzRlODBiNWFlZA==
5 20 January, 20:28
Haha, that was a cool flight of the Il-28! 🙂 I was almost expecting it to hit the walls at a few times.
2 21 January, 06:08
Recessed frames at a clear part are really a weird feature. I like how this one progresses.
I share your thoughts on the KV masks. Often I wished that they would have done them on paper, but on the other hand they are often the only game in town.
1 21 January, 19:00
I may be wrong but that masking material sounds like the wrap they use to protect surfaces and sometimes stuck on new appliances ect.
Your doing a great job of it so far very crisp work 👍😀
1 21 January, 19:32
Mr D, it's exactly like that material. I was almost ready to fire up the primer when I noticed that almost all the masks had began to lift off at the corners. It would have been a nightmare to have paint blowing in on every glass pane. I am now spending the evening cutting my own masks from Tamiya masking tape, based on the KV Models masks - even if it takes more time, it is definitely worth it.
2 21 January, 20:01
It's best to do that, some times it's good to breakdown tedious jobs into 2 or 3 sessions bit more comfortable than way, always best to double check maskings just prior to airbrushing, sometimes even Tamiya lifts on awkward edges, l usually put a bit of colored thick clear on bits like that as a masking fluid 8/10 times it holds down better... I go almost to the edge.
I use a thick gloopy clear as it doesn't run under joints in masking.
I don't use latex fluid as it is sticky n pulls of at slightest touch.
Good luck with it 🤞👍
1 21 January, 20:13
The material is Oramask 810. I don't like it at all. This foil gets big cars and things, but it's hardly applicable for our purposes. If I make masks, I prefer 3M 50-series. Much more flexible, stretchable and thin. Yes, the glue is much more aggressive, but for a period of two weeks it doesn't cause any problems. I tried to buy paper in large sheets. At least A3 or at least A4, but I couldn't find such anywhere.
2 21 January, 20:21
Couple of companies provide bigger masking paper sheets, e.g.Techmod:
mojehobby.pl/product..abuki-5-pcs.-A4.html
4 21 January, 20:33
Shiny black primer coat added and I am now waiting for the primer to fully dry before I can start metalizing. As the Ilyushin is standing on my work bench, I cannot help but thinking that it looks kind of like a dominatrix dressed in black vinyl for the night at some goth or S/M club - but hey, what do I know of such things.
1 22 January, 15:16
🤣🤣🤣
"A friend of mine told me that he had seen one and it supposedly looked similar." 😇
1 22 January, 18:08
soo nice, what type of Black Gloss primer did you use ? look really smooth.
1 22 January, 21:25
Pierre, it's a primer called Badger Stynylrez (or UMP Ultimate Primer) and comes in different colors and sheens. It really levels out beautifully if you spray wet on wet, but it requires a lot of air from your airbrush (almost 3 PSI) and cannot be thinned with anything I have tried. Also, you need to use a very wide nozzle (0.4 mm works for me).
2 23 January, 09:36
Hi Thomas,
I think a small error sneeked in concerning the pressure. 3psi is way too little. 30psi would equal about 2 bar and 3 bar are roughly 45 psi. As I never managed to achieve satisfactory results with this primer with pressures up to 2 bar, I guess 45psi/3bar might be the intended recommendation.
2 23 January, 13:14
Thank you Thomas, if I read correctly accordinng to Michael you are around 2 bar (30 psi), how do you manage not to flood the model and keep the detail such as you did ?
1 23 January, 13:25
Michael, you are absolutely right. 3 bars is what I meant. Thank you for correcting!
23 January, 13:27
Pierre, the Badger primer is so thick that a lot of air is needed to simply drive the airbrush. It sprays great with about 2.8 bars of pressure and levels out beautifully. I first mist the surfaces so a good adhesion layer is created, wait a few seconds, and then paint wet-on-wet until the surface is fully covered. If the coat dries inbetween the spray coats, it will lose some if its shine, so you need to work really fast!
3 23 January, 14:27
Finally metalized! Now let's give the metal a day to cure before applying the protecting varnish coat and then proceed with the detail paintjob on gear bays and stuff. Also, boy, it took quite some time to fully spray this model, sometimes I am glad that I don't do 48's.
3 24 January, 09:22
That metallic finish looks great Thomas. What prompted the brush application of the gloss coat?
1 2 February, 04:43
Alec, it levels out so perfectly that I literally cannot see where I had applied it. With a brush I can more easily keep track, based on panel lines. With the airbrush I tend to miss spots and these naked areas will later cause a terrible mess when doing the weathering with oils.
1 2 February, 10:21
finish look great ! I would not that imagine that brushed varnish coat levelled so well. soon decal ?
1 2 February, 11:17
Naram, yes, I love this stuff! There are really not a lot of decals to go on this Hungarian Beagle, basically just national insignias and tactical numbers. Also very little weathering as the metal was varnish coated. A bit boring, but that's how they were.
2 February, 11:44
Very nice 👍 great aircraft.. coming along nicely, the rear gun turret/ball has same shape as the on on my Be-6
Nice project 😀
1 4 February, 20:59
The Beagle is not abandoned, I am just waiting for the decals to arrive in the mail! 🙂
2 22 February, 22:35